User interface
Introduction
The user interface serves as a wizard for the creation, administration and parameterization of load configurations. Once created, they can be run from the user interface itself or from the command line. This chapter focuses on the operation of the user interface, and later chapters will detail the parameterization options and their implication in loading data.
User interface visual effects consume a lot of CPU resources in virtual machines, therefore, during executions, all visual effects are frozen in order not to overload system resources unnecessarily. Furthermore, the "Stop/Start" button allows these effects to be deactivated or activated at will.
Although the window does not have the traditional borders, the typical actions can be carried out in it:
The "ball" in the upper right corner, has hidden inside the buttons "Maximize" or "Restore", "Exit" and "Minimize", in that order and from top to bottom. When hovering over the buttons with the mouse, the corresponding tooltips are displayed indicating the actions carried out by the hidden button.
You can also resize the window by standing at the edges of the window, and when the cursor changes shape, you can resize the window.
The user interface is made up of different "panels", which will be shown or hidden depending on the user's actions. However, the Panel de Resultados will always be visible. There, you will be informed of certain details to take into account in the configuration options, the details of the execution of the configurations will be displayed and the possible errors and exceptions that may occur will also be displayed.
Panel Administración de Configuraciones
The following figure shows the "Panel de Administración de Configuraciones". The panel manages the configurations and their parameterization. It does not manage the tables or their content that Insert Bulk Bestia needs in the source and destination.
Panel Administración de Configuraciones - 1
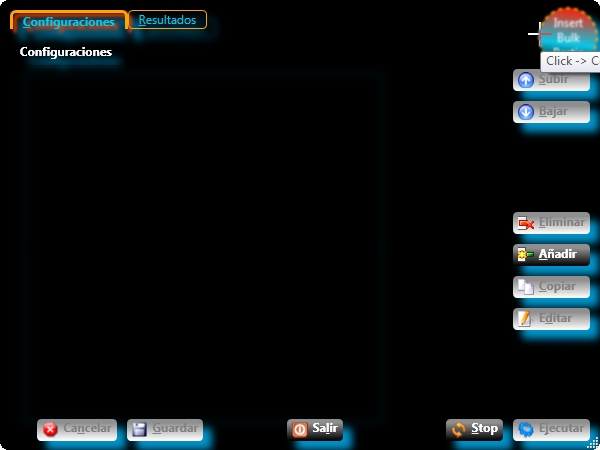
The buttons will be activated/deactivated depending on the actions that the user performs. However, actions that lead to the alteration of the ".ini" file that contains the configurations, and that have not been stored in said file, cause many buttons to be disabled. Therefore, it will be necessary to "Guardar" or "Cancelar" these changes so that the desired buttons are enabled.
-
Añadir
Allows the creation of a new configuration. It will prompt for a name, which cannot contain the following characters:, (comma), = (equal), " " (white space), and # (hash).
The new configuration will be created with the default values and without connection strings to the source and destination. If the tables used by Insert Bulk Bestia do not exist in the source and destination, they will not be created until the configuration is executed. If they already exist, they are not populated with data for that configuration until it is executed.
The "Editar" and "Ejecutar" buttons will be disabled until the changes are saved or canceled.
-
Lista de Configuraciones
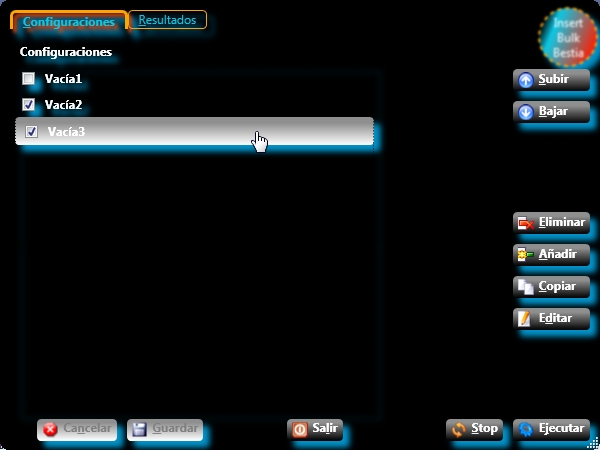
As configurations are created, they will appear in the "Panel de Administración de Configuraciones". Each configuration has a check box associated with it, which indicates if said configuration is to be executed when the "Ejecutar" button is pressed. In the figure, the "Vacía2" and "Vacía3" configurations will be executed in that order when "Ejecutar" is clicked. When one of these boxes is checked or unchecked, the "Editar" and "Ejecutar" buttons will be disabled until the changes are saved or canceled.
By clicking on a certain configuration, it is selected to be able to work with it. In the figure, the "Vacía3" configuration is the selected one, and it can be edited, copied, deleted, and the order in which it is executed with respect to the rest of the configurations can be changed.
Panel Administración de Configuraciones - 2
-
Copiar
Copy the selected configuration with a new name. It only copies the configuration options, it does not copy the contents of the tables (source and destination) from the copied configuration to the new configuration.
The "Editar" and "Ejecutar" buttons will be disabled until the changes are saved or canceled.
-
Eliminar
Deletes the selected configuration in the "Lista de Configuraciones". It does not delete the tables that Insert Bulk Bestia has created in the source and destination, nor does it delete the data that these tables have associated with the deleted configuration.
The "Editar" and "Ejecutar" buttons will be disabled until the changes are saved or canceled.
-
Editar
Edits the run options for the selected configuration. The "Panel de Administración de Configuraciones" will disappear and the "Panel de Conexiones" will appear, where you can begin to parameterize said configuration.
You will return to the "Panel de Administración de Configuraciones" after "Guardar" the changes made in the parameterization or "Cancelar" them.
-
Subir/Bajar
They alter the order in which the configurations will be executed.
-
Cancelar
Cancel the modifications made in the "Panel de Administración de Configuraciones" by reloading the content of the ".ini" file where they are stored. The "Editar" and "Ejecutar" buttons will be enabled if the proper conditions are met.
-
Guardar
Save the modifications made in the "Panel de Administración de Configuraciones" in the ".ini" file. The "Editar" and "Ejecutar" buttons will be enabled if the proper conditions are met.
-
Salir
Close the application. If there are pending modifications, request confirmation from the operator.
-
Stop/Start
Stop or start the visual effects in order to reduce the resources that Insert Bulk Beast consumes. During the execution of the data loads, these visual effects are stopped automatically. At the end of the load, the visual effects are activated again.
-
Ejecutar
The configurations that have their checkbox checked and are run in the order that they appear in the "Lista de Configuraciones". When you press this button, the "Panel de Resultados" is activated, showing the actions that Insert Bulk Bestia performs at all times.
Panel de Resultados
It consists of a text window where various information is presented to the user. The following figure, for example, shows how to parameterize the connection string to SQL Server, specifically the "PacketSize" parameter and also shows how to create a user with the appropriate permissions so that Insert Bulk Beast works correctly.
Panel de Resultados - 1
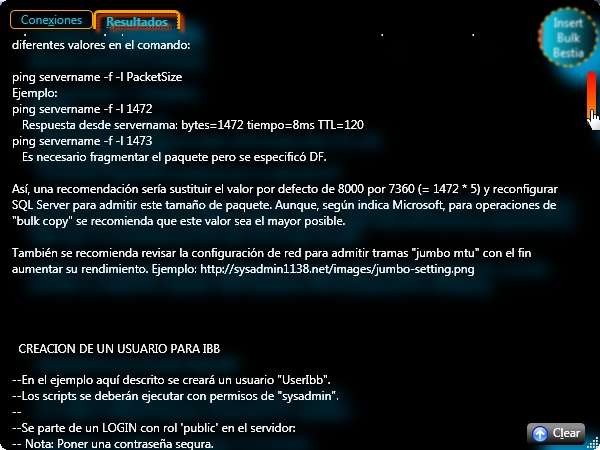
This panel has a "Clear" button that deletes the text presented. In this panel, the typical accelerators work, such as Ctrl-A to select all the text, or Ctrl-C to copy the selected text.
In addition to this panel, Insert Bulk Bestia generates several "trace" files:
- InsertBulkBestia.log and InsertBulkBestia_Error.log: These are log files where the actions performed by Insert Bulk Bestia are being transferred. The second file contains detailed information on the errors that may occur in the application. If you wish to provide information about these errors, this file is the one that you should send to the website for further analysis and correction of possible incidents.
- InsertBulkBestia_NombreConfiguracion.log and InsertBulkBestia_Error_NombreConfiguracion.log: They are log files created for each configuration that is executed. Like the previous ones, the second file contains detailed information on the errors that could occur during the execution of a certain data load configuration. If you wish to provide information about these errors, this file is the one that you should send to the website for further analysis and correction of possible incidents.
Panel de Conexiones
This panel will be the one that appears after pressing the "Editar" button when a configuration is selected. From here, the parameterization of said configuration begins.
Panel de Conexiones - 1
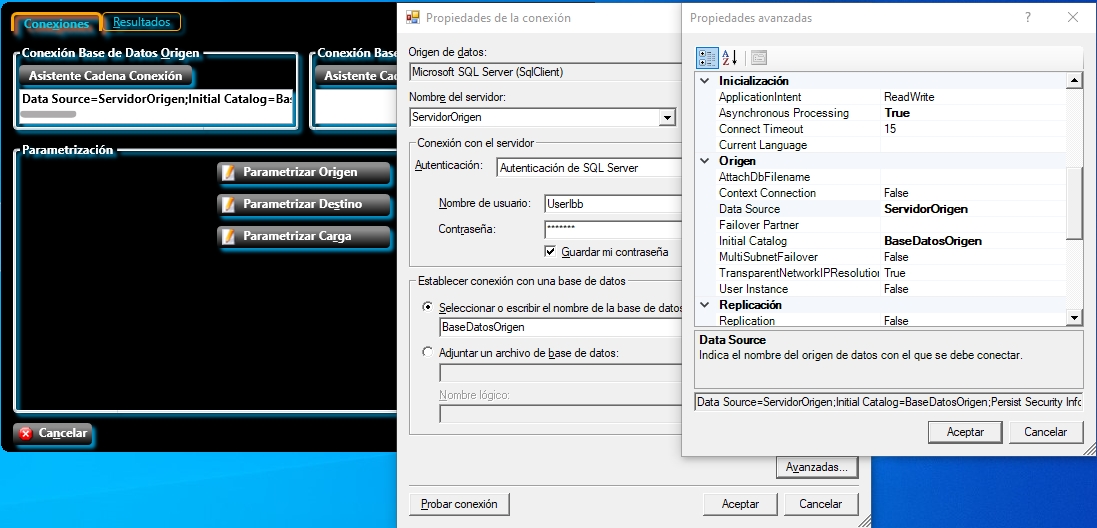
First, the connection strings to the source and destination databases must be supplied. For this you have a wizard that will help you to set them.
Insert Bulk Bestia enforces certain properties on the connection string so that it can work correctly:
Asynchronous Processing=True;MultipleActiveResultSets=True;Application Name="Insert Bulk Bestia";ApplicationIntent=ReadWrite.
The connection strings will be stored in the file ".ini" UNENCRYPTED, so your security will be compromised since the password will be stored in them. In future versions, this situation will be solved.
After establishing the connection strings, the "Panel de Resultados" shows relevant information regarding the efficiency of the connections and the requirements that the user used for the connections must have.
-
PacketSize
This parameter is a great unknown, even for Microsoft, since it does not usually provide much information about its usefulness and influence on the efficiency of connections to the Database. Here, the useful information that has been found regarding this parameter is shown, which is the same as the application shows:
  CADENA DE CONEXIÓN


  Parámetro: "PacketSize"


  El valor de este parámetro influye tanto en el rendimiento de la red como en el de SQL Server.
  Microsoft tiene varios artículos con recomendaciones para este parámetro:
  http://microsoft-ssis.blogspot.com.es/2013/04/performance-best-practice-network.html
  y https://msdn.microsoft.com/en-us/library/system.data.sqlclient.sqlconnection.packetsize.aspx


  En SQL Server se configura como se indica en:
  https://msdn.microsoft.com/en-us/library/ms177437(v=sql.120).aspx


  También se debería tener en cuenta el valor de MTU de la red, de forma
  que se aprovechase totalmente la capacidad de los paquetes de red
  evitando ineficiencias. Este valor se puede encontrar probando con
  diferentes valores en el comando:


    ping servername -f -l PacketSize


  Ejemplo:


    ping servername -f -l 1472

       Respuesta desde servernama: bytes=1472 tiempo=8ms TTL=120

    ping servername -f -l 1473

       Es necesario fragmentar el paquete pero se especificó DF.


  Así, una recomendación sería sustituir el valor por defecto de 8000 por
  7360 (= 1472 * 5) y reconfigurar SQL Server para admitir este tamaño de
  paquete. Aunque, según indica Microsoft, para operaciones de "bulk copy"
  se recomienda que este valor sea el mayor posible.


  También se recomienda revisar la configuración de red para admitir
  tramas "jumbo mtu" con el fin aumentar su rendimiento.

  Ejemplo: https://en.wikipedia.org/wiki/Jumbo_frame
  aunque la mayoría de las veces no es aconsejable habilitarlas.
-
Permisos de Usuario
In order to perform certain tasks in the database, the user used to connect must have certain permissions. In the "Panel de Resultados", after establishing a connection string, an example of how to create a user is shown to be able to use it with Insert Bulk Bestia and that has the appropriate permissions. This script is shown below:
  CREACION DE UN USUARIO PARA IBB


  --En el ejemplo aquí descrito se creará un usuario "UserIbb".

  --Los scripts se deberán ejecutar con permisos de "sysadmin".

  --

  --Se parte de un LOGIN con rol 'public' en el servidor:

  -- Nota: Poner una contraseña segura.


    USE [master]

    GO

    CREATE LOGIN [UserIbb] WITH PASSWORD=N'UserIbb', DEFAULT_DATABASE=[master],

        DEFAULT_LANGUAGE=[Español], CHECK_EXPIRATION=OFF, CHECK_POLICY=ON

    GO


  --Se crea el usuario correspondiente en la Base de Datos master

  -- Es necesario crearlo aquí para introducir el certificado. Más tarde, si se desea, se puede

  -- eliminar, aunque podría volver a ser necesario para la actualización de

  -- la aplicación.


    USE [master]

    GO

    CREATE USER [UserIbb] FOR LOGIN [UserIbb] WITH DEFAULT_SCHEMA=[dbo]

    GO


  --Se le asignan los permisos de suplantar al usuario 'dbo' en [master]:

  -- IBB añadirá el Certificado [InforCustomCryptCert] a [master] y a partir

  -- de él, creará un Login(Inicio de sesión) sobre ese Certificado con el

  -- que poder ejecutar Assemblies firmados y autenticados con dicho

  -- Certificado.

  --    Es el procedimiento adecuado sin tener que poner la Base de Datos en

  --    un estado inseguro: TRUSTWORTHY ON

  --

  --También se desea que los Assemblies instalados puedan ser utilizados por

  --desarrollos ajenos a IBB, por lo que se le asignará el usuario 'dbo'

  --como propietario.


    USE [master]

    GO

    GRANT IMPERSONATE ON USER::[dbo] TO [UserIbb]

    GO

    USE [master]

    GO

    GRANT ALTER ANY LOGIN TO [UserIbb]

    GO


  --Se le asignan permisos para alterar la configuración del servidor

  --ya que IBB debe poder ejecutar ensamblados de .NET


    USE [master]

    GO

    GRANT ALTER SETTINGS TO [UserIbb]

    GO


      --Las instrucciones que se van a ejecutar en IBB son:

      USE [master]

      EXEC sp_configure 'show advanced options', 1

      RECONFIGURE

      GO

      USE [master]

      EXEC sp_configure 'clr enabled', 1

      RECONFIGURE

      GO


  --Los Assemblies que ejecutan tareas en paralelo necesitan permisos para

  --ver el número de CPUs


    USE [master]

    GO

    GRANT VIEW SERVER STATE TO [UserIbb]

    GO


    USE [master]

    GO

    GRANT CREATE CERTIFICATE TO [UserIbb]

    GO

    USE [master]

    GO

    GRANT ALTER ANY CERTIFICATE TO [UserIbb]

    GO

    USE [master]

    GO

    GRANT CREATE ASSEMBLY TO [UserIbb]

    GO

    USE [master]

    GO

    GRANT ALTER ANY ASSEMBLY TO [UserIbb]

    GO

    USE [master]

    GO

    GRANT EXTERNAL ACCESS ASSEMBLY TO [UserIbb] WITH GRANT OPTION

    GO

    USE [master]

    GO

    GRANT UNSAFE ASSEMBLY TO [UserIbb] WITH GRANT OPTION

    GO


  --Se crea el usuario correspondiente en las Bases de Datos Origen y Destino


    USE [BaseDatosOrigenDestino]

    GO

    CREATE USER [UserIbb] FOR LOGIN [UserIbb] WITH DEFAULT_SCHEMA=[dbo]

    GO


  --Se le asignan los permisos de suplantar al usuario 'dbo' en ambas Bases

  --de Datos.

  -- Ello permitirá que los objetos que se creen pertenezcan al usuario

  -- 'dbo', además de al usuario "UserIbb". De esta forma los objetos

  -- podrán ser utilizados por otros usuarios.

  -- También permite crear esquemas con la sentencia:

  --    CREATE SCHEMA esquema AUTHORIZATION dbo


    USE [BaseDatosOrigenDestino]

    GO

    GRANT IMPERSONATE ON USER::[dbo] TO [UserIbb]

    GO


  --Se le asignan los roles 'db_datareader' y 'db_datawriter' y 'db_ddladmin'

  --al usuario en ambas Bases de Datos (Origen y Destino)


    USE [BaseDatosOrigenDestino]

    GO

    ALTER ROLE [db_datareader] ADD MEMBER [UserIbb]

    GO

    ALTER ROLE [db_datawriter] ADD MEMBER [UserIbb]

    GO

    ALTER ROLE [db_ddladmin] ADD MEMBER [UserIbb]

    GO


  --Se le asignan los permisos para poder ejecutar procedimientos almacenados

  --al usuario en ambas Bases de Datos (Origen y Destino)


    USE [BaseDatosOrigenDestino]

    GO

    GRANT EXECUTE TO [UserIbb]

    GO

    USE [BaseDatosOrigenDestino]

    GO

    GRANT EXECUTE ON SCHEMA::[dbo] TO [UserIbb]

    GO


    USE [BaseDatosOrigenDestino]

    GO

    GRANT CREATE ASSEMBLY TO [UserIbb]

    GO

    USE [BaseDatosOrigenDestino]

    GO

    GRANT ALTER ANY ASSEMBLY TO [UserIbb]

    GO


  --Se le asignan los permisos para poder ver el estado de la Base de Datos

  --en ambas Bases de Datos (Origen y Destino)


    USE [BaseDatosOrigenDestino]

    GO

    GRANT VIEW DATABASE STATE TO [UserIbb]

    GO
Panel Origen
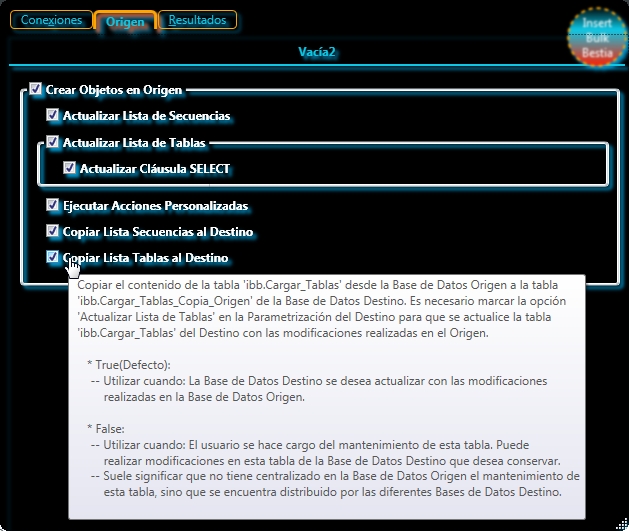
In the "Panel de Conexiones", when you click on the "Parametrizar Origen" button, the "Panel Origen" is displayed that allows you to decide what actions will be carried out at the origin. As can be seen in the figure, each option has a tooltip associated with exhaustive information.
Panel Origen - 1
-
Crear Objetos en Origen
In the chapter Estrategia de Copia de Datos, it was assumed that there is a main database (production), which you want to replicate in the rest of the environments. If Insert Bulk Bestia can create its objects in said database, the operator will be able to make its adaptations there. Later, by replicating the structure of the origin, these adaptations will be taken to the rest of the destinations. In this way, the control of these adaptations is centralized in the main database.
If, on the other hand, these objects are not created in the source database, Insert Bulk Bestia must obtain the information from the source in another way. It will extract it from the destination database, since it is assumed that both databases are identical or similar.
Note: This behavior will change in future versions in order to expand the possible data sources, such as Oracle, etc.
Not creating the objects at the source also means that any adaptations made by the operator for copying data must be made at the destination. Therefore, when you replicate the structure of the source database to the destination, you will lose those adaptations.
-
Actualizar Lista de Secuencias
Execute the stored procedure ibb.Cargar_Tablas_Actualiza_Secuencias indicating that it is the source database: Add to ibb.Cargar_Tablas_Secuencias records with the new sequences and deletes the records corresponding to those that have disappeared. The operator must indicate how the new sequences are reinitialized.
-
Actualizar Lista de Tablas
Execute the stored procedure ibb.Cargar_Tablas_Actualiza indicating that it is the source database. The usefulness of this parameter can be understood with the description made in the section 1º Lectura de la Estructura del Origen.
-
Actualizar Cláusula SELECT
Parameter passed to the stored procedure ibb.Cargar_Tablas_Actualiza to tell to update the SELECT clauses of each table in case they have undergone changes since the last time this table was updated. The usefulness of this parameter can be understood with the description made in the sections 1º Lectura de la Estructura del Origen and 3º Actualización del Destino con la Estructura del Origen.
It must be taken into account that activating this parameter will cause the modifications made manually in the SELECT clauses to be lost, but if you do not activate it, you will lose the new modifications that have been made in the database. For this, custom actions at the source are the perfect alternative to make the desired modifications to the SELECT and WHERE clauses. In this way, on the one hand, the table will be updated with the changes that have occurred in the origin, and on the other, the modifications that you wish to make will be preserved.
-
-
Ejecutar Acciones Personalizadas
Execute the stored procedure ibb.Cargar_Tablas_Acciones_Programables_Origen. In it, the operator can program custom actions that alter the two previous tables after updating. For example, you can automatically sort new tables that appear, or you can change the SELECT clauses automatically.
-
Copiar Lista de Secuencias al Destino
Indicates to copy the content of ibb.Cargar_Tablas_Secuencias from origin to ibb.Cargar_Tablas_Secuencias_Copia in the destiny.
Checking this option automatically makes the option check Actualizar Lista de Secuencias in the "Panel Destino".
-
Copiar Lista Tablas al Destino
Indicates to copy the content of ibb.Cargar_Tablas from origin to ibb.Cargar_Tablas_Copia_Origen in the destiny. The usefulness of this parameter can be understood with the description made in the section 2º Traspaso de la Estructura del Origen al Destino.
-
Panel Destino
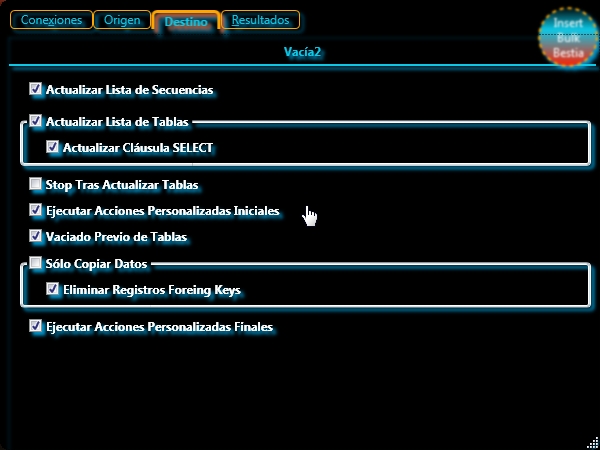
In the "Panel de Conexiones", when clicking on the "Parametrizar Destino" button, the "Panel Destino" is displayed, which allows you to decide what actions will be carried out on the destination.
Panel Destino - 1
-
Actualizar Lista de Secuencias
Execute the stored procedure ibb.Cargar_Tablas_Actualiza_Secuencias indicating that it is the target database. The usefulness of this parameter can be understood with the description made in the sections 3º Actualización del Destino con la Estructura del Origen and 4º Actualización del Destino con la Estructura del Destino.
-
Actualizar Lista de Tablas
The Tables to Copy have the same approach as the sequences: that the operator has centralized at the origin the alterations that he wishes to transfer to the rest of the destinations.
However, here it is easier to understand, since in the table ibb.Cargar_Tablas there are a series of fields for the source and another series of fields for the destination. With this option, you are indicating that the fields corresponding to the origin must be updated at the destination with the information from the origin. And that of the destination that is updated with the structure that the destination database has, adding or removing tables according to the destination has undergone modifications.
-
Actualizar Cláusula SELECT
Parameter passed to the stored procedure ibb.Cargar_Tablas_Actualiza to indicate to update the SELECT clauses of each table in case they have undergone modifications since the last time this table was updated. The usefulness of this parameter can be understood with the description made in the sections 1º Lectura de la Estructura del Origen and 3º Actualización del Destino con la Estructura del Origen.
It must be taken into account that activating this parameter will cause the modifications made manually in the SELECT clauses to be lost, but if you do not activate it, you will lose the new modifications that have been made in the database. To do this, custom actions on the target are the perfect alternative to make the desired modifications to the SELECT and WHERE clauses. In this way, on the one hand, the table will be updated with the changes that have occurred in the destination, and on the other, the modifications that you wish to make will be preserved.
-
-
Stop Tras Actualizar Tablas
The first time you run a configuration, you typically want to check what data is to be loaded and how it is to be loaded. Activating this option, the execution of the load stops at this point (point 8 of the section Algoritmo de Copia de Datos), allowing the user to review the load.
This is the moment when the user should program custom actions, both at the source and at the destination, to customize the load. Once these actions have been carried out, you can run the configuration again without checking this option, so that the data load would be carried out with the desired adaptation.
-
Ejecutar Acciones Personalizadas Iniciales
Checking this option executes the stored procedure ibb.Cargar_Tablas_Acciones_Programables_Destino_Iniciales. In it, the operator can program custom actions that alter the two previous tables after their update. For example, you can automatically sort new tables that appear, or you can change the SELECT clauses automatically.
-
Vaciado Previo de Tablas
Normally, when a configuration is run, the tables will be cleared before loading. However, there will be times when you only want to load a certain table and only certain records, indicated in the WHERE statements, without emptying the target table. Unchecking this option does not perform the previous dump of tables.
-
Sólo Copiar Datos
NO OPERATIVO
Faced with certain problems in the source database, such as excessive fragmentation of the database files, or some other problem like that, it is useful to have solutions such as:
Copy the data as quickly as possible from a source database to another destination. With Insert Bulk Bestia the data would only be copied, without regenerating the target structure, thus saving considerable time in large databases. Later, repair the source database, and recover the data from the destination database again.
In order to increase the efficiency of returning the data to the source database, Insert Bulk Bestia would regenerate all the indexes of the segmented tables.
-
Eliminar Registros Foreing Keys
When checked, they will delete the necessary records from the child table to be able to raise a Foreing Key. This is useful when the data being copied comes from a database that is ONLINE, since, during the copy, the records of the parent table may be copied first. In the time that elapses until the records of the child table are copied, insertions into the parent table and the child table can occur. In that case, the child table will have orphaned records, which will make the Foreing Key unable to be lifted.
If it is not checked, it indicates that they do not lift those Foreign Keys that have orphaned records in the child table.
-
-
Ejecutar Acciones Personalizadas Finales
Checking this option executes the stored procedure ibb.Cargar_Tablas_Acciones_Programables_Destino_Finales. In it, the operator can program custom actions that alter the copied data, such as manually masking certain data, or changing the paths stored in tables.
Panel Carga
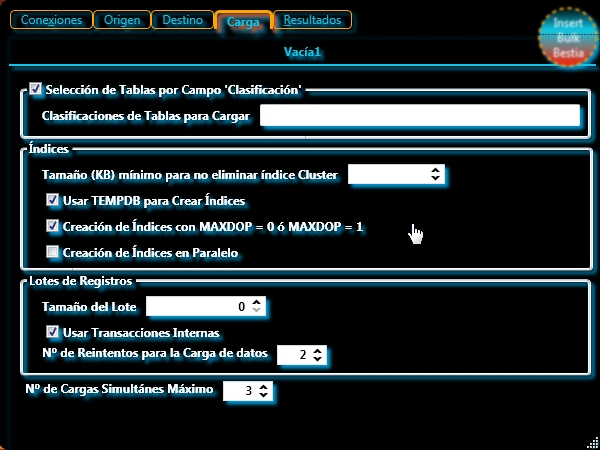
In the "Panel de Conexiones", when you click on the "Parametrizar Carga" button, the "Panel Carga" is displayed, which allows you to decide how the data transfer will be carried out:
Panel Carga - 1
-
Selección de Tablas por Campo "Clasificación"
Insert Bulk Bestia loads all tables that have field 'CargarTabla' to 1 in the table ibb.Cargar_Tablas Using this option, Insert Bulk Bestia is told to mark with a 1 those tables whose 'ClassificacionTabla' field matches those indicated in the following option. If this option is unchecked, it will be the responsibility of the user to mark the tables that he wishes to load and to carry out the pertinent initializations. This action can be carried out with the ibb.Cargar_Tablas_Acciones_Programables_Destino_Iniciales.
-
Clasificaciones de Tablas para Cargar
List of values of the field 'ClassificacionTabla' of the table ibb.Cargar_Tablas separated by ,(comma) that will serve to indicate the tables to be loaded.
NULL (no text) if you do not want to make any automatic selection of tables to load. However, the relevant initializations are performed.
-
-
Índices
-
Tamaño (KB) mínimo para no eliminar índice Cluster
Size in KB that all the indexes of a given table occupy from which the cluster index of said table is not eliminated. The rest of the indexes if they are eliminated. This parameter should be set experimentally, since depending on the available hardware, it is possible that in very large tables, greater performance is obtained by not eliminating the cluster index.
Possible values:
0 -> Leave all cluster indexes
NULL -> Remove all cluster indexes
>0 -> Eliminate the cluster indexes of those tables whose space in KB occupied by the indexes is less than indicated
-
Usar TEMPDB para Crear Índices
Use the Tempdb database to sort the indexes when they are built.
This parameter, together with the following one, are key to improving the continuity of the indexes, that is, improving the final performance of the Database.
If this option is checked, the time of the construction of the indexes is reduced at the cost of using space in the Tempdb Database, so it must be sized appropriately. In addition, it improves their continuity.
This option should not be checked when the size of this database is critical or it is used by other databases whose use is critical and you do not want to make intensive use of this database.
-
Creación de Índices con MAXDOP = 0 ó MAXDOP = 1
Use the maximum degree of parallelism in the creation of indexes or serialize said process.
If this option is checked, the time required to build the indexes is reduced at the cost of using all the available CPUs. However, the continuity of the indices worsens, worsening the final performance of the Database.
Note: As an alternative to this setting, it is recommended to set this parameter to False and use parallel index construction. In this way, each CPU will be used to build a single index, but as many indexes as available CPUs on the server will be built in parallel.
-
Creación de Índices en Paralelo
Use the Insert Bulk Bestia libraries built into SQL Server to execute parallel processes. Certain types of license may not allow for this.
If this option is checked, the indexes are created in parallel making a very intensive use of CPU and Disks.
-
-
Lotes de Registros
-
Tamaño del Lote
Num of records that are sent to the destination in each batch.
A value of 0 indicates that all records are shipped in a batch from source to destination. If 'Usar Transacciones Internas' is indicated, each batch is sent to the destination in a separate transaction.
Note: The use of large transactions implies that in the Destination Database, the Transaction Log must be correctly sized. It also means more time to copy data. In case of error, the batch records will not be inserted.
-
Usar Transacciones Internas
Use one transaction for each batch of records sent to the Destination.
-
Nº de Reintentos para la Carga de Datos
Insert Bulk Bestia can retry (as many times as indicated in this parameter) the loading of those tables (or segments) that have failed. It is designed to protect against network outages.
If 'Tamaño del Lote' is different from 0, Insert Bulk Bestia will empty the table (or segment) and try again. If you want to add records to a certain table, you must indicate a 'Tamaño del Lote' of 0 and check the option 'Usar Transacciones Internas'. In that case, when a failure occurs, the Destination table will remain in its original state, since Insert Bulk Bestia will not empty said Destination table.
-
-
Nº de Cargas Simultáneas Máximo
Num of threads or Num of tables to be loaded simultaneously. Certain types of license may not allow for this.
It is the key parameter that allows speeding up the loading of data from a Source to Destination Database. It must be modified with extreme caution depending on the Hardware available, the Origin and the Destination.
For example: If you want to copy the data from a Production Database while it is ONLINE, it is recommended to put a low value (3-5) in this parameter, so that it does not saturate said Database. On the contrary, if you want to copy the data from a Staging Database to a Development Database, you can set a high value for this parameter (10-20) to reduce the copy time by making a very intensive use of CPU, Network and Disks.
If problems are detected, this maximum number can be reduced to 1 per Insert Bulk Beast during loading.